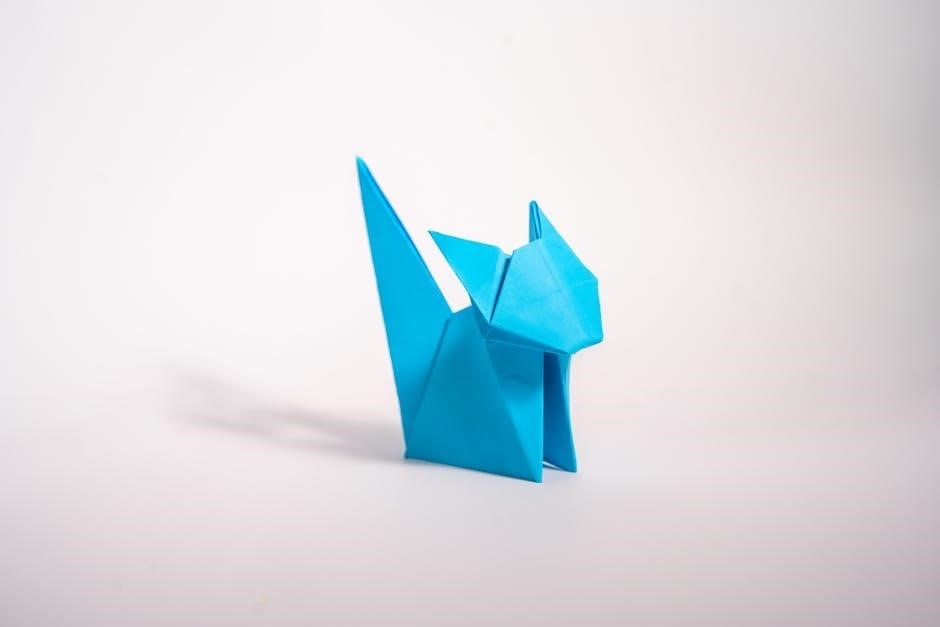
Origami Cat Instructions PDF: A Comprehensive Guide
Discover the art of creating an Origami Cat with our detailed guide. This comprehensive PDF tutorial includes step-by-step instructions‚ diagrams‚ and tips for all skill levels. Perfect for beginners and experts alike‚ it covers everything from basic folds to advanced techniques. Customize your cat with unique designs and practice to master the craft!
Welcome to the fascinating world of origami cats! These charming paper creations have captured the hearts of many‚ offering a fun and creative way to explore the art of origami. Whether you’re a beginner or an experienced folder‚ origami cats are a delightful project that can be customized to suit your style. With the help of a detailed PDF guide‚ you can learn the step-by-step process of bringing these adorable felines to life using just a single square of paper.
Origami cats are not only a great way to practice basic folding techniques but also allow for artistic expression. From simple designs perfect for kids to more complex models for advanced folders‚ there’s an origami cat for everyone. The process of creating these cats teaches patience‚ precision‚ and creativity‚ making it a rewarding hobby for all ages. This guide will walk you through everything you need to know to start your origami cat journey‚ ensuring you have fun while mastering the craft.
Materials Needed for Making an Origami Cat
To create an origami cat‚ you’ll need a few simple materials to get started. The most essential item is a square sheet of origami paper. Standard origami paper works perfectly‚ but you can also use tissue-foil‚ chiyogami‚ or any decorative paper of your choice. The size of the paper can vary‚ but a 15cm (6-inch) square is ideal for most designs. If you don’t have origami paper‚ you can use regular printer paper or even scrapbook paper‚ as long as it’s square.
Optional materials include a pencil or marker for drawing the cat’s face and features‚ scissors for cutting (if needed)‚ and a ruler to help with precise folds. Some designs may also require a small amount of glue or tape for added stability. Choose paper with different colors on each side to create a unique‚ two-toned effect. With these basic materials‚ you’re ready to start folding your origami cat and bringing it to life!
Step-by-Step Instructions for Making an Origami Cat
Craft your origami cat with our step-by-step guide. Start by folding the paper diagonally to form a kite shape. Make mountain folds for the ears and body. Add details like eyes and a tail for a personalized touch.
Step 1: Preparing the Paper and Initial Folds
Begin by selecting a square sheet of origami paper‚ ensuring it is flat and free of creases. For best results‚ use high-quality paper with contrasting colors on each side to enhance the final design. If your paper is not square‚ follow the instructions to create a square sheet from standard A4 or letter-sized paper.
Next‚ place the paper on a clean‚ flat surface with the colored side facing down. Fold the paper diagonally to create a triangle‚ then unfold it to form a visible crease. Repeat this process for the other diagonal‚ ensuring the creases intersect at the center.
Now‚ fold the paper in half along the midline‚ bringing one edge to meet the other. This will create a smaller rectangle. Unfold the paper and use the creases as guides for the next steps. These initial folds are crucial for achieving symmetry and balance in your origami cat.
Finally‚ turn the paper over and repeat the midline fold on the other side. This will create a valley fold that will help shape the cat’s body. Your paper is now prepared for the foundational folds that will bring your origami cat to life.
Step 2: Creating the Base Shape and Foundation
With the initial creases in place‚ fold the paper diagonally to form a triangle‚ ensuring the edges align perfectly. This triangle will serve as the foundation for your origami cat. Next‚ fold the triangle in half along the midline to create a smaller‚ more compact shape. This step establishes the base for the cat’s body.
Now‚ fold the top corners of the triangle downward‚ meeting at the center line. This creates a kite-like shape‚ which is essential for forming the cat’s head and ears. Use the creases from Step 1 as guides to ensure accuracy.
Finally‚ fold the bottom edge of the kite upward‚ tucking it under the top layers to form a flat base. This step stabilizes the structure and prepares it for further detailing. Make sure all folds are crisp and precise‚ as this base shape will determine the overall proportions of your origami cat.
Step 3: Forming the Cat’s Features (Ears‚ Face‚ and Body)
Begin by folding the top edges of the kite shape into small triangles to create the cat’s ears. Fold each triangle upward‚ ensuring they are symmetrical and point slightly outward. Next‚ fold the lower section of the kite shape to form the cat’s body‚ creating a gentle curve for a natural appearance.
To define the face‚ use a marker or pencil to draw on eyes‚ a nose‚ and a mouth. For a more detailed look‚ you can add whiskers or texture to the ears. If desired‚ fold a small flap at the base of the body to create a tail‚ securing it with a gentle crease.
Adjust the layers to ensure the ears and face are proportionate. Fold the body slightly to give the cat a three-dimensional pose. This step is crucial for bringing your origami cat to life with personality and charm.
Step 4: Final Adjustments and Details
Once the basic shape is formed‚ refine your origami cat by making final adjustments. Start by ensuring all folds are crisp and edges are aligned. Use a gentle touch to flatten any areas where the paper may not lie perfectly smooth. For a polished look‚ fold a small triangle at the base of the head to create a neck‚ and adjust the ears to ensure they are even and slightly rounded.
Add personality to your cat by drawing on eyes‚ a nose‚ and a mouth using a fine-tip marker. For a more realistic appearance‚ gently bend the ears and tail to give the cat a lifelike posture. If needed‚ use a small fold behind the head to secure any loose layers. Finally‚ inspect your cat for symmetry and make any necessary tweaks to achieve a balanced look. These small details will bring your origami cat to life and make it truly unique.
Common Mistakes to Avoid When Making an Origami Cat
When crafting an origami cat‚ several common mistakes can affect the final result. One of the most frequent errors is making uneven or inaccurate folds‚ especially during the initial steps. This can lead to asymmetrical features‚ such as lopsided ears or a misaligned face. Another mistake is not pressing down firmly enough on creases‚ which can cause the paper to spring open and disrupt the shape. Additionally‚ many people forget to fold the paper diagonally first‚ which is essential for achieving the correct proportions.
Avoid folding the paper too quickly or without precision‚ as this can result in a bulky or misshapen body. Applying too much pressure may also tear the paper‚ especially if it’s thin. Lastly‚ ensure the tail and ears are securely folded to prevent them from coming loose. By paying close attention to these details and taking your time‚ you can avoid these pitfalls and create a smooth‚ professional-looking origami cat.
Tips for Different Skill Levels (Beginners‚ Intermediate‚ Advanced)
Whether you’re a novice or an experienced folder‚ these tips will help you master the origami cat. For beginners‚ start with high-quality origami paper and follow each step slowly. Practice basic folds‚ like the diagonal and kite shapes‚ before moving on to details. Use a ruler to create sharp creases‚ and don’t hesitate to unfold and adjust as needed.
For intermediate folders‚ focus on precision when forming the ears‚ face‚ and body. Pay attention to symmetry and ensure all folds align properly. Experiment with subtle details‚ such as adding texture to the ears or refining the tail shape.
Advanced folders can explore custom designs‚ like adjusting the proportions or incorporating intricate patterns. Try using dual-sided paper for a unique look or experimenting with additional accessories‚ such as whiskers made from thin strips of paper. Regardless of your skill level‚ patience and practice are key to achieving the best results.
Customizing Your Origami Cat
Personalize your origami cat to make it truly unique! Start by experimenting with different types of paper‚ such as patterned‚ textured‚ or metallic sheets‚ to give your cat a distinctive look. For added charm‚ use markers or colored pencils to draw whiskers‚ eyes‚ or a nose. You can also add small accessories like a bow tie or collar made from ribbon or string.
For a more creative touch‚ try modifying the design itself. Adjust the size of the ears or tail for a personalized appearance‚ or fold additional details like paws or a tongue. If you’re feeling adventurous‚ use dual-sided paper to create a two-tone effect‚ with one color for the body and another for the ears or face. Finally‚ consider displaying your origami cat in a creative way‚ such as attaching it to a greeting card‚ turning it into a puppet‚ or incorporating it into a larger paper craft project. These customization options allow you to express your creativity and make your origami cat one-of-a-kind.
Troubleshooting Common Issues
Encountering challenges while making an origami cat is common‚ but most issues can be easily resolved. One frequent problem is asymmetrical features‚ such as uneven ears or a crooked face. To fix this‚ carefully check your folds and ensure symmetry at each step. If the cat’s body doesn’t lie flat‚ it may be due to incorrect base folds; try unfolding and redoing the initial kite shape.
Another issue is paper pucker or wrinkles‚ which can ruin the model’s smooth appearance. Gently unfold the paper and retry the fold‚ applying even pressure. If the cat’s structure feels weak or collapses‚ reinforce the foundation folds by folding them more firmly. Creases not appearing clearly? Use a bone folder or similar tool to sharpen them. For wrinkled paper‚ lightly smooth it with a warm hairdryer. Finally‚ if steps are unclear‚ refer to video tutorials or diagrams for visual guidance. With patience and practice‚ these issues can be overcome‚ ensuring your origami cat turns out perfectly.
Completing an origami cat is a rewarding achievement that combines patience‚ skill‚ and creativity. Whether you’re a beginner or an experienced folder‚ this project offers a fun and artistic way to explore the world of origami. Don’t be discouraged if your first attempt doesn’t turn out perfectly—practice is key to mastering the folds and details. Each try allows you to refine your technique and understand the paper’s behavior. Experiment with different paper sizes‚ colors‚ and patterns to make your origami cat unique. Share your creations with friends or use them as thoughtful gifts. The satisfaction of bringing a paper cat to life is a testament to the beauty of origami. Keep practicing‚ and soon you’ll be creating adorable origami cats with ease and confidence. Happy folding!